ComfyUI: Free Node-based AI Workflow Tool
Practical Examples and Setup Advanced Image & Video Generation

Hello there!
AI-generated pictures and videos are everywhere, and it literally takes me a couple of minutes to whip something up for my projects.
But why create random images when you can build efficient workflows? You know that professionals don’t mess around, they build systems to make their processes deeper and more consistent. And in this guide, you’ll learn to use AI to create professional AI content (yes, like this below), and ComfyUI is the main character here.

In this piece, we:
- Show what cool things you can create with ComfyUI
- Explain what Comfy UI and node-based tools are
- How can you embed it into your working workflow
- Give an account of how to set up ComfyUI
Let’s go!
Keep your mailbox updated with practical knowledge & key news from the AI industry!
If you’ve read our FloraAI post, you’re probably already aware of node-based tools. ComfyUI is in the same league, but it is free and open source! It means that your creation process has zero limits. Look at what it can do!

One guy created a 5-minute sci-fi film with ComfyUI
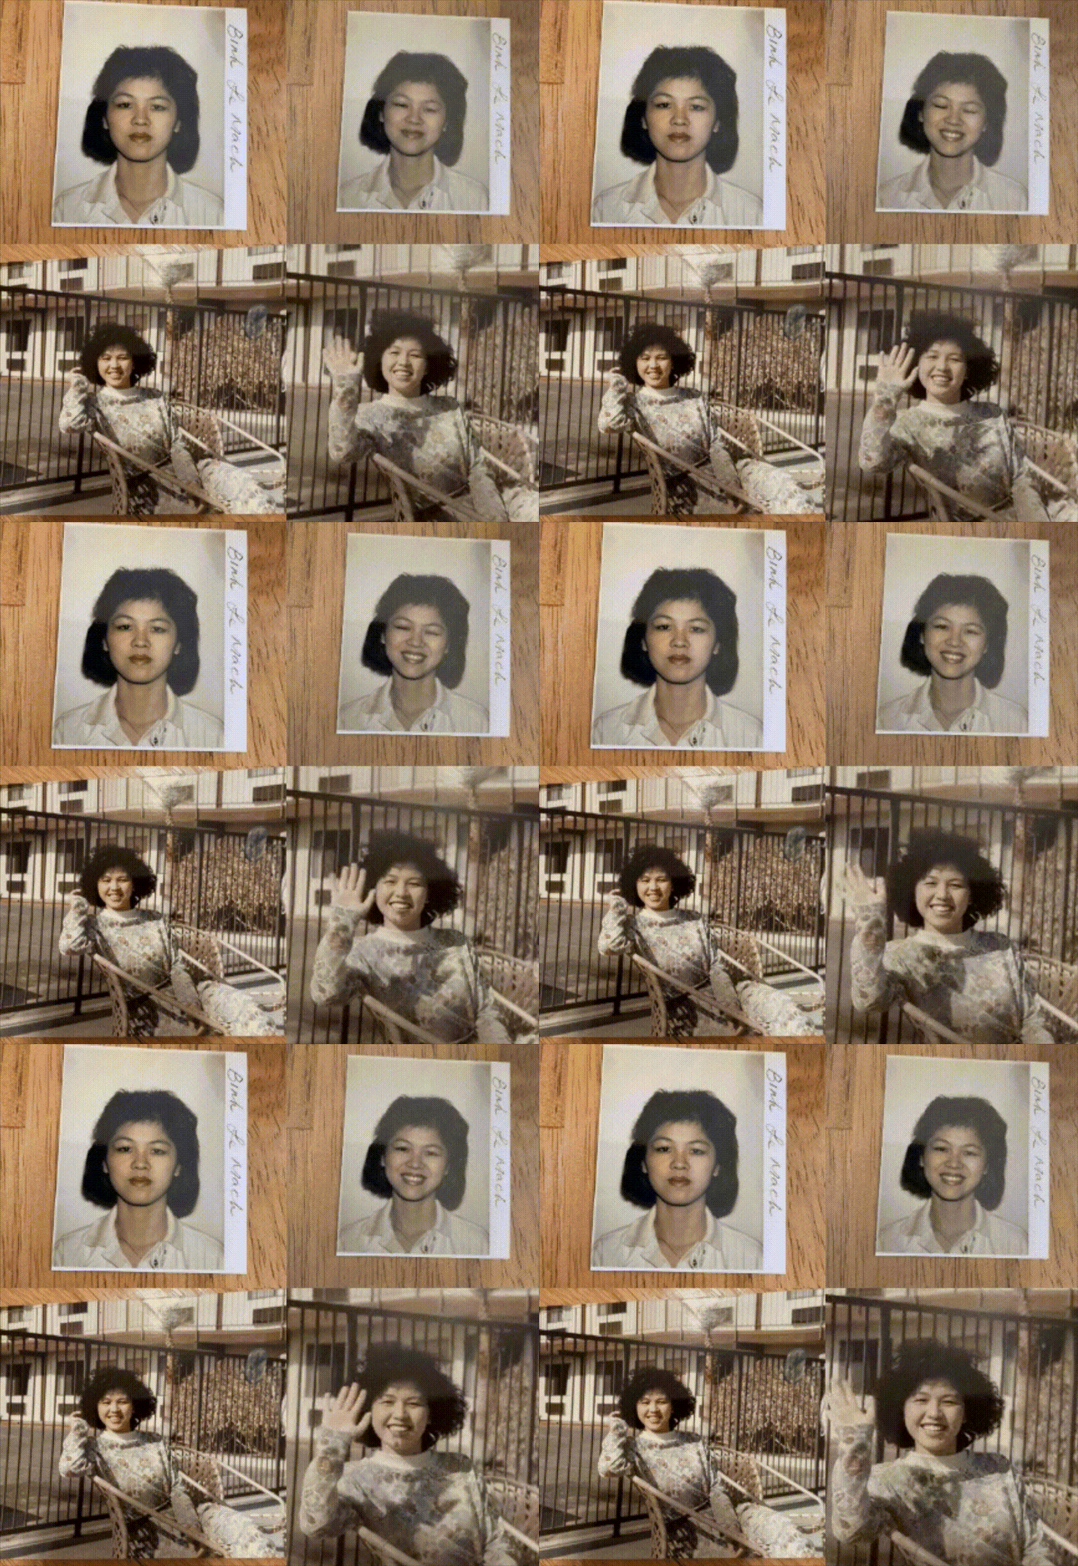
Another user made old photos of his mom come to life with Wan2.2
Why you should try node-based ComfyUI
You know that annoying thing where you misspell one word in your prompt and the whole image comes out wrong? Then you’re stuck rewriting it again and again, getting random results with zero control over what’s actually happening.
Creators handle this with ComfyUI. It’s for when you need something super specific and you’re tired of guesswork. All pictures, prompts, and ideas are in front of you.
Maybe you’re already tired of this phase (😅), but you still don’t need coding skills to start. The key feature is workflow building.
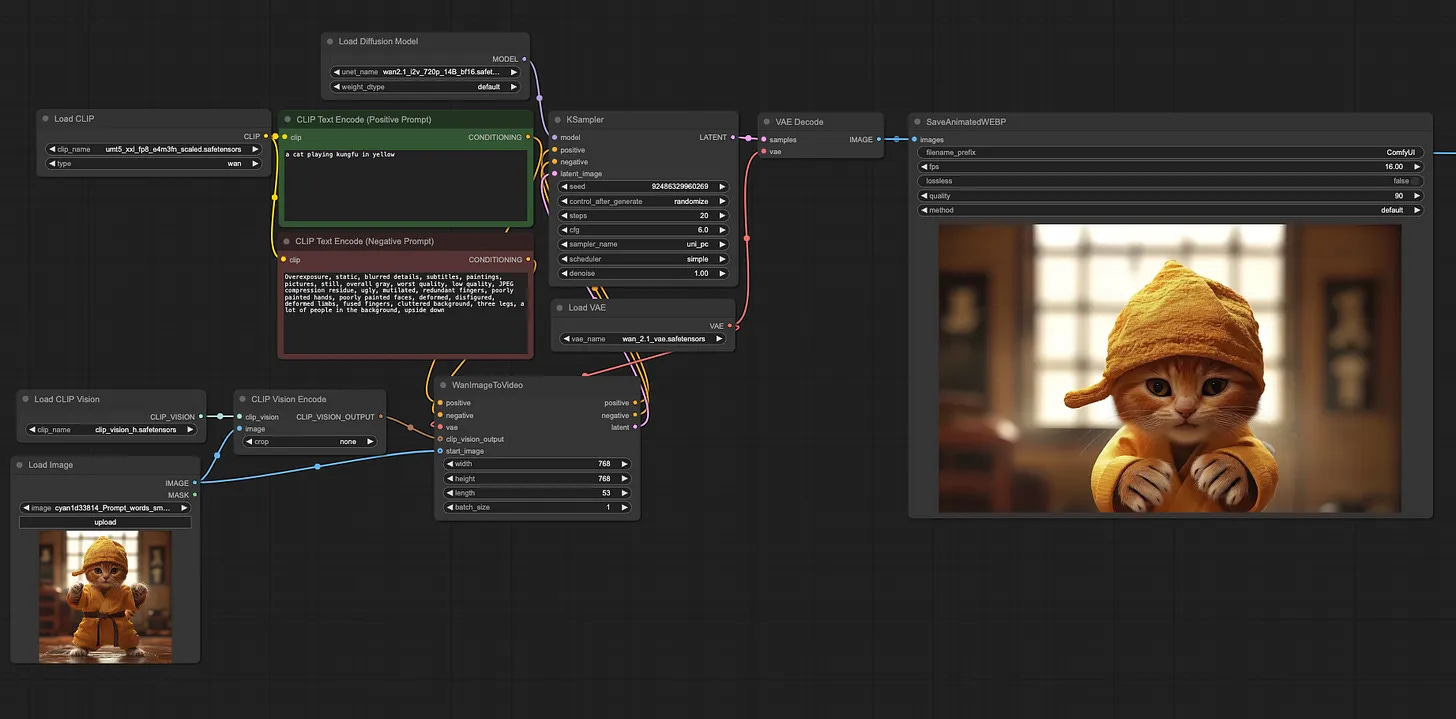
Looks scary, I know, but it’s worth trying
How does it work? Instead of a chat interface, buttons, and sliders, it uses a visual node editor (as you see in the picture). You drag and connect nodes from text to settings, from settings to picture to build workflows.
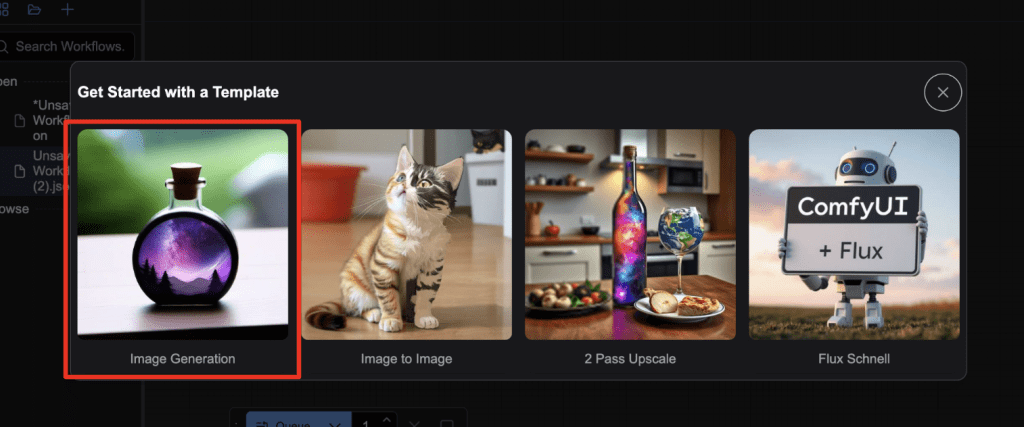
It is not that scary, because that’s you who is in charge of the process, and you can make simple text-to-image setups or complex multi-step pipelines for image and video generation, processing, and analysis. What is more, there are already a lot of ready-to-use templates.
It’s open!
As I already mentioned, it’s absolutely free and accessible for everyone. It runs on your PC using your GPU. You work with big AI models like Stable Diffusion, Wan, Flux, and others more without waiting in cloud server queues. Limits that online services have, such as generation caps, VRAM restrictions, speed throttling, and paywalls, don’t really bother you.
ComfyUI puts you in the driver’s seat with mix control points, swap models mid-process, handle video, images, and analysis all in one workflow.
So basically, ComfyUI stands out with:
- Node-based workflow, where every part of the generation process is a node, and you can combine them however you want. The nodes show you exactly how the model works: what gets processed, when, and how. This helps you understand what’s happening under the hood.
- You can experiment with prompts, tweak processes, and modify images and videos however you want, all in one place.
- Integration with CUDA: you can use a GPU to speed up the generation process.
- There’s a big community with tons of ready-made workflows and custom nodes. Workflows work like code: you can export them, share them, and even run them programmatically.
Are there alternatives?
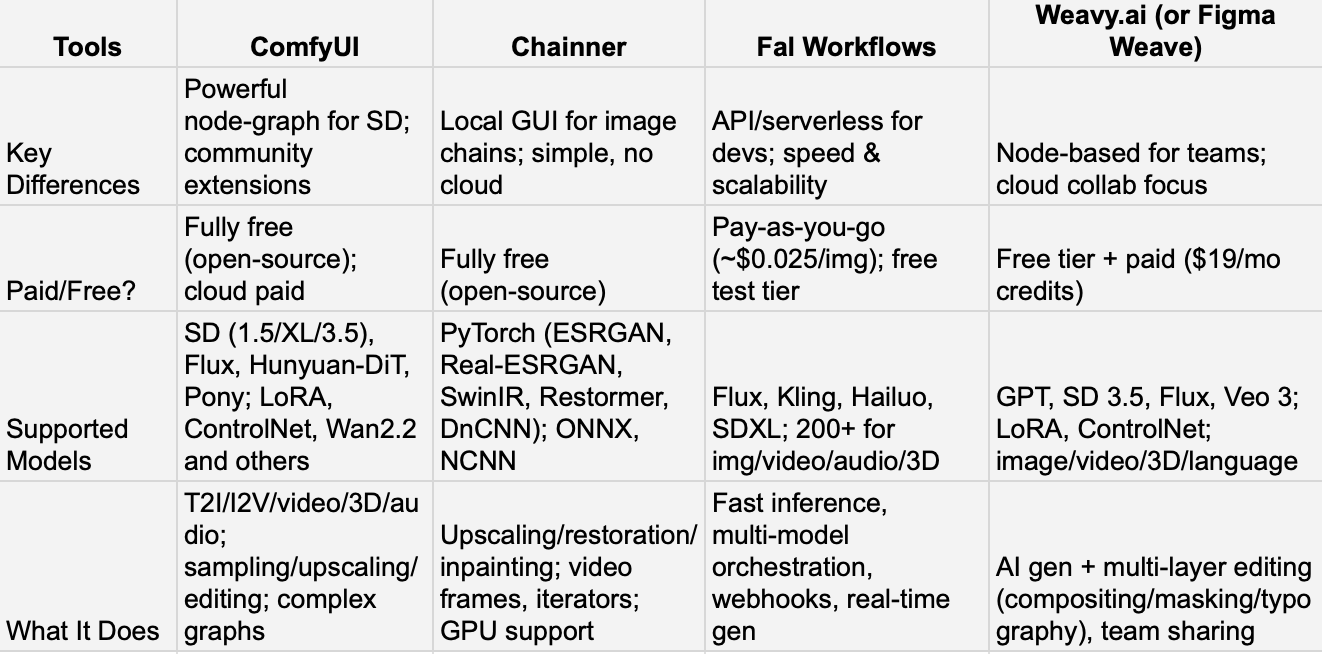
Pretty much, ComfyUI’s competitors either borrow bits of its node-style logic or aim for more automatic workflows. For example, Fal.ai runs in the cloud. You use their API and pay per call, which works well for teams or devs who don’t want to handle hardware. Weavy is built around shared workflows, and it gives you a visual node interface in the cloud so your whole team can build together. Chainner is more niche, because it’s focused on upscaling and restoration.
Personally, ComfyUI is its own thing. You get tons of freedom, and you run any SD-style model on your machine, but it feels like taking a content creation course.
You can pick the one that fits how you work. ComfyUI takes time to learn (totally more than 30 min), because everything is manual, but once you get it, it feels unlimited.
Is ComfyUI a great fit for you?
Of course, as I said, everyone can use ComfyUI, but not everyone needs it. It works out for:
- AI artists and marketing teams are able to experiment with models, build complex generation chains, manually mix nodes and parameters, and create custom pipelines. If you seek simplicity and minimal learning time, don’t even start. It may drain you.
- Business researchers and developers. As ComfyUI supports extensions and custom nodes, you can add 3D environments, mask tools, multi-layer editors, and API integrations. This lets you handle big projects and visualize exactly what you need. What is more, it protects the privacy of projects, because ComfyUI runs completely locally.
- Collaborative teams take advantage of the ability to save, share, and reuse workflows and templates. This lets teams organize work, train members, and reproduce processes by standards.
What we can use it for
Let’s explore more of what ComfyUI can do. Below, we’ll cover its main elements and how to set them up for beginners to get started comfortably.
ComfyUI for Marketing and Sales
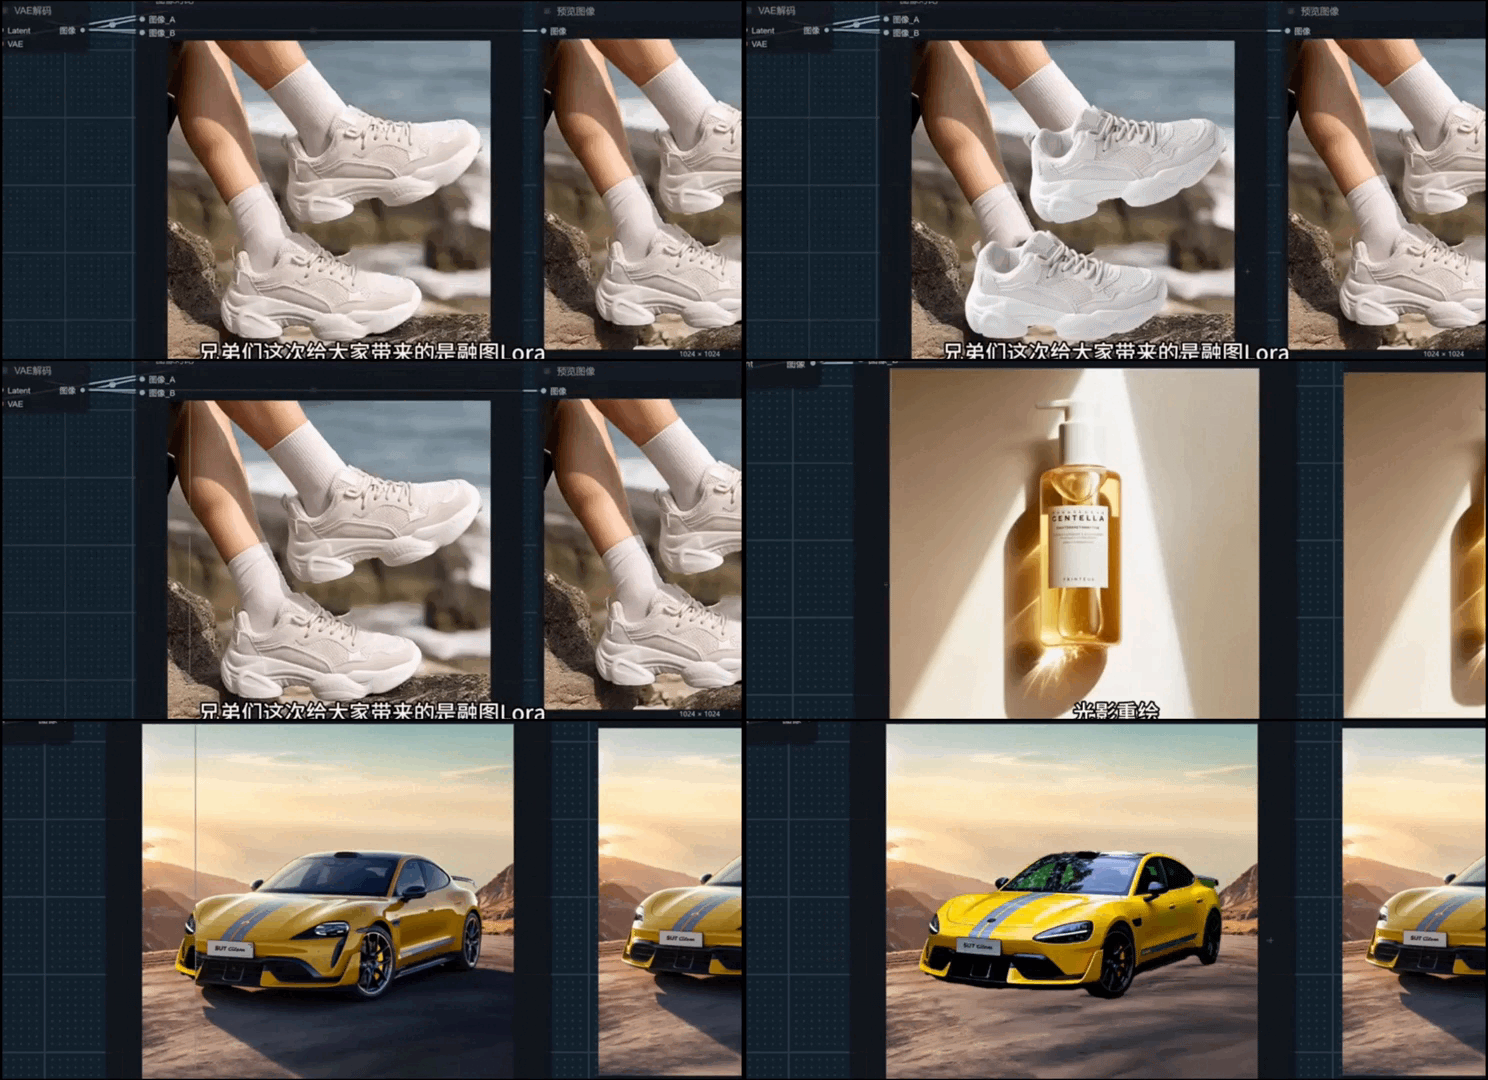
Literally like Photoshop, but faster
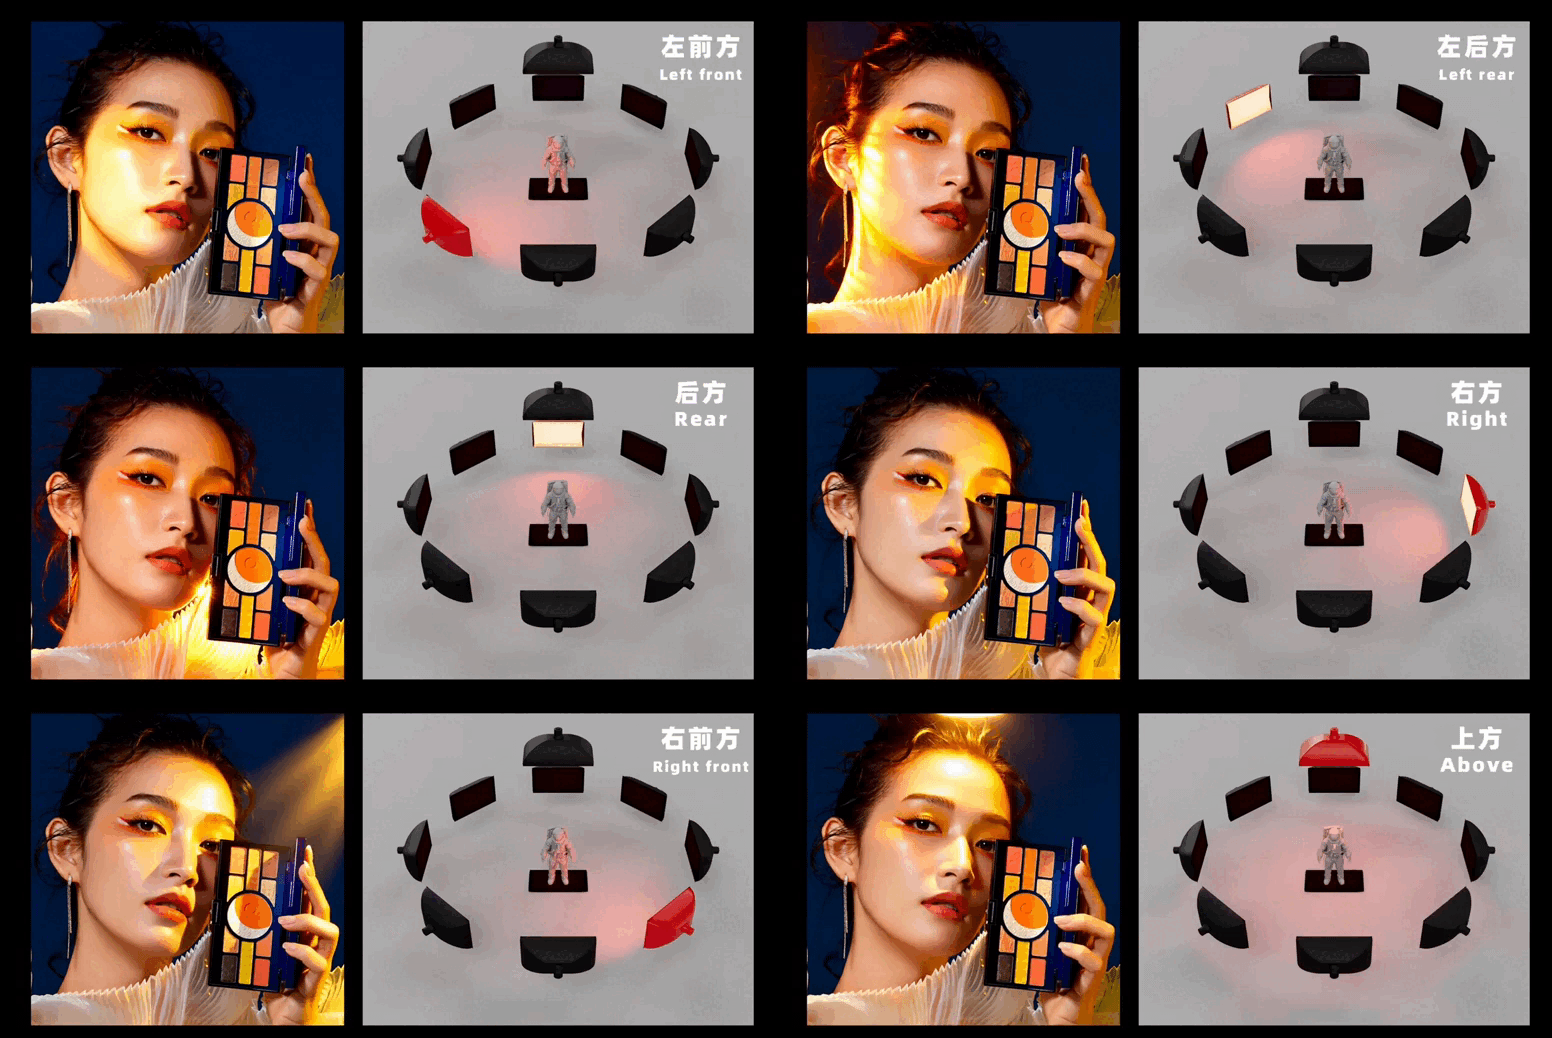
If you don’t have a budget for studio shootings, it’s no longer a problem
Everything in ComfyUI screams “use me for marketing”. You can swap backgrounds, set up lighting, fix colors, clean up details, add shadows, and nail a brand’s look without messing around with random prompts. Works great for product shots, ads, banners, and quick tests before a campaign. So, dear marketers and online sellers, it’s worth considering.
ComfyUI for all types of designers
You can crank out dozens of character variations, outfits, architectural stuff, art styles, and go on, just by changing your prompt. And all this is thanks to LoRA (actually, previous marketing examples were made with LoRA as well).
It’s a little add-on thing that teaches (in nerd terms, fine-tunes) your AI models specific styles, details, and tweaks you need. The thing is that without LoRA is complicated to get precise details (like a specific pattern on clothing or exact character features).
Ultimately, it can speed up anyone working with visuals:
- Game devs can create quick NPC variations and early concept drafts
- Fashion designers can test silhouettes, outfits with quick try-ons
- Animation artists can try different character looks and props
- Product designers, you should also take notes, because you can preview shapes, colors, and materials in a few steps
Wan model – For social media videos and movie creations


Wan is an open video generation model from Alibaba. It creates videos, animations, and images from text. All in all, with the right models (for example, these videos are made with Wan 2.1 VACE), you can maintain high control over movement, style, lighting, and objects.
##### Among other features:
- Inpainting using a reference Image (when you have an image that you like, but you want to change only certain parts, inpainting is the best method.)
- Outpainting (this way, you can broaden the content in the edge area of the original image)
- Multi-Step Pipelines (сombine several nodes for effects like denoising, upscaling, or style transfer in one workflow)
How to start with ComfyUI
So, we have to download ComfyUI here. Below, we will grab all the internal components.
- ComfyUI requires Git, so download it here. It’s impossible to launch the program without it.
- Then, if you want to manage our custom nodes of ComfyUI (in theory, you do), you’ll need to download ComfyUI-Manager. This extension provides a hub feature to access a wide range of custom stuff within ComfyUI.
- Finally, launch ComfyUI.
- Select GPU
- Install location
- Figure out Desktop Settings
(Don’t worry, the program will help you navigate)
- After all, the “ComfyUI” folder should appear on your computer. There, you will add all your models and workflows.
- If everything is correct, the installer will complete and automatically enter the ComfyUI Desktop interface, then the installation is successful.
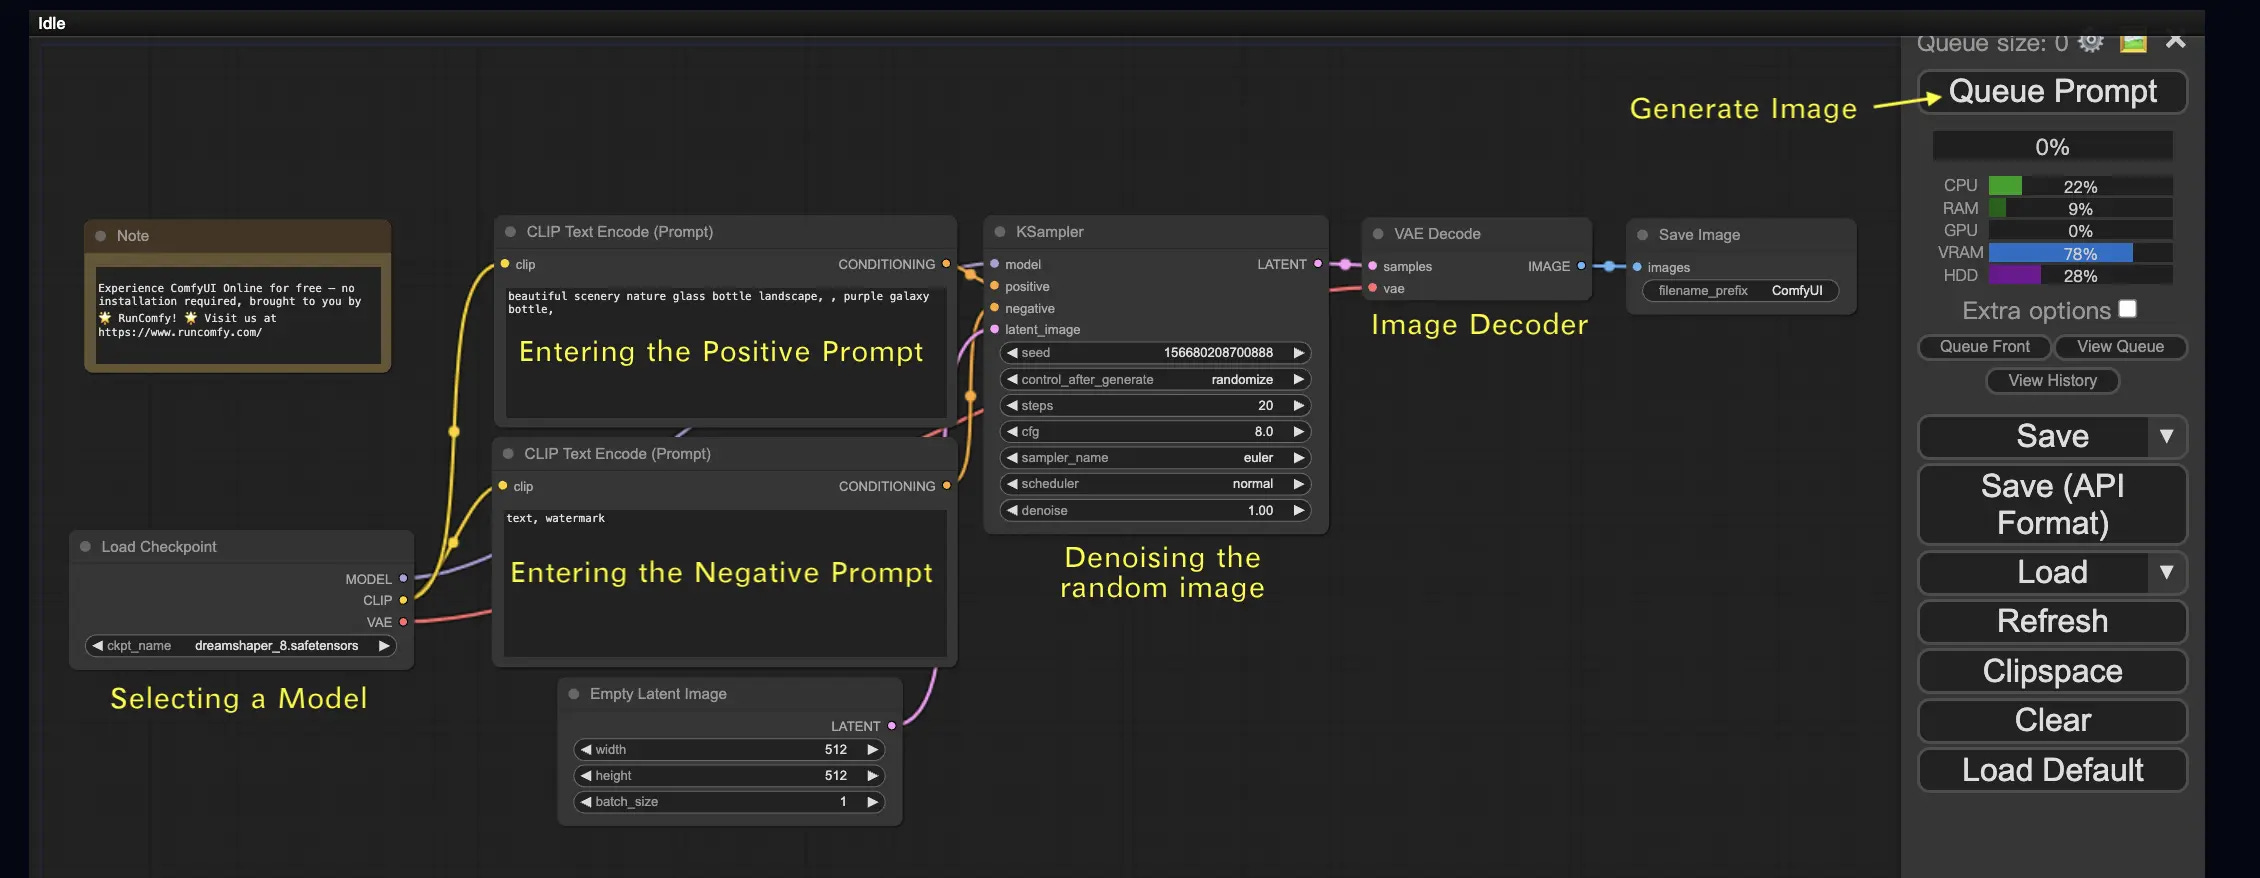
We’ve mentioned the word “node” so many times that it’s finally time to break down these core nodes and understand how they work:
- Load Checkpoint: Here, we choose an AI model. Different models do different things, so pick one that fits your goal.
- CLIP Text Encode (two nodes): one for what you want in the image (positive prompt), one for what you don’t want (negative prompt). Type your descriptions here.
- Empty Latent Image: sets your image size. The default is 512x512 pixels.
- KSampler: controls how the image gets made. Key settings include:
+ Steps: How long the AI works on the image (20-30 is a good start) + CFG: How closely it follows your prompt (7-8 works well) + Seed: Changes the random starting point (lock it to get consistent results) + Denoise: How much variation to allow (1.0 for new images)
- VAE Decode: converts the AI’s work into a viewable image.
- Inside the app, the creators have already prepared templates to get things together.
Since the system can be complex for beginners, I recommend using ready-made community workflows (others you can find on YouTube, Reddit, or GitHub). They include all the necessary steps, so you don’t have to create a workflow from scratch.
In any case, if you want to create something more complex, you need to know how to deal with models and workflows. Let’s delve into the example of a 3D case.
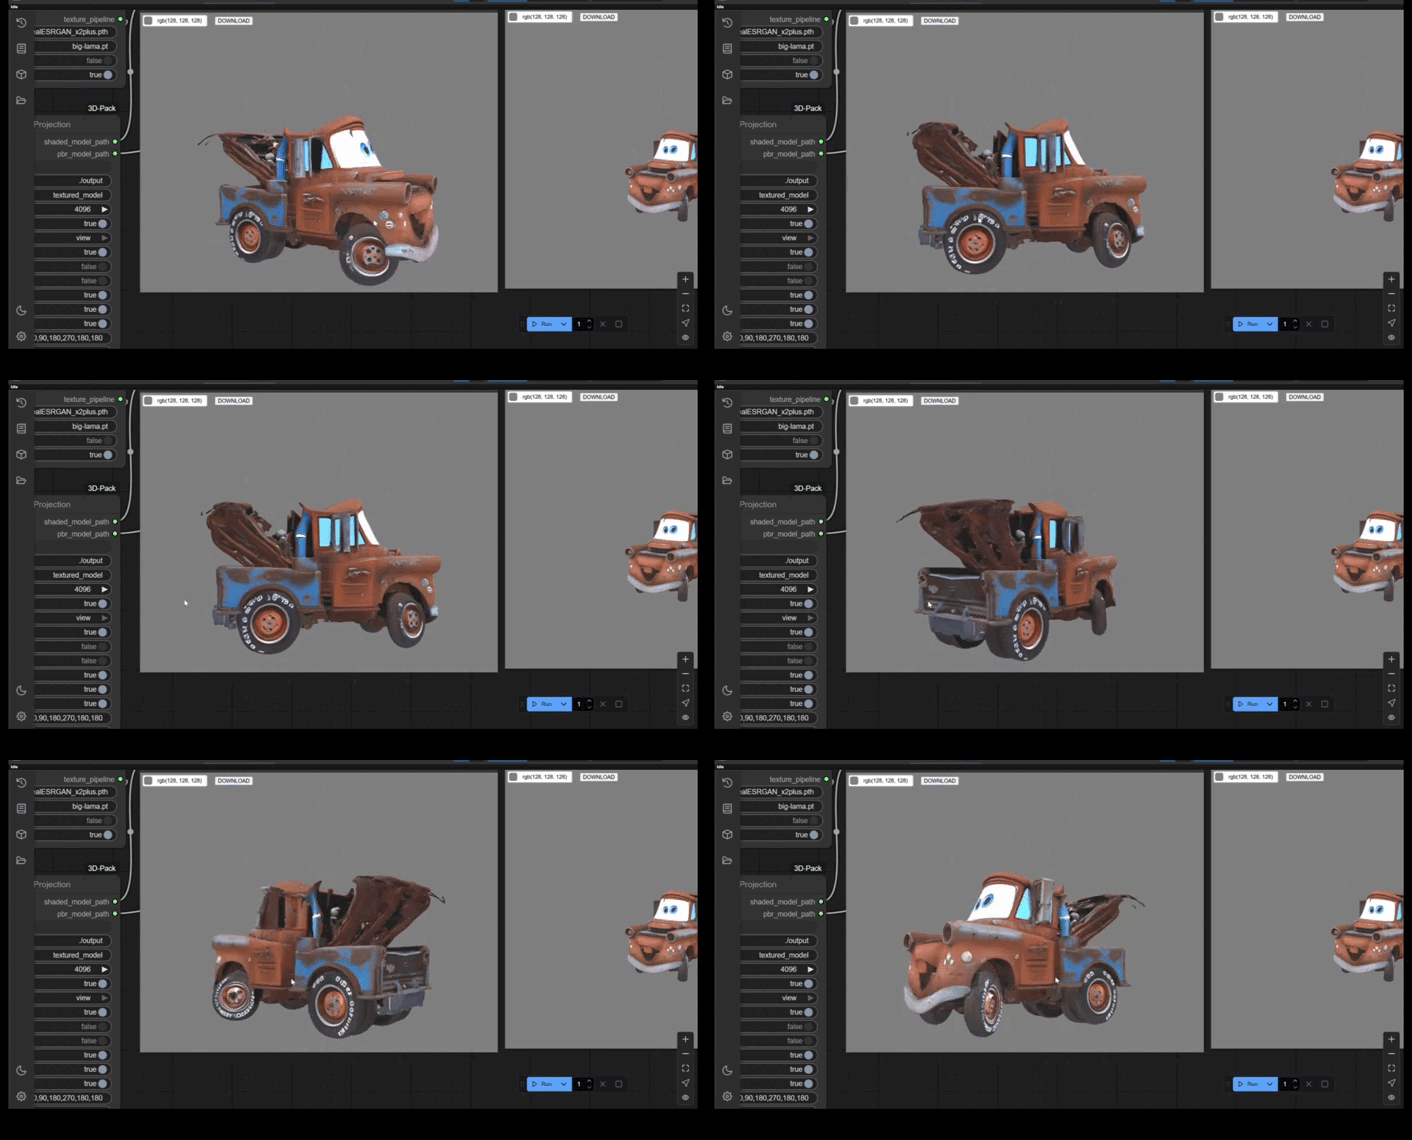
ComfyUI let you create, move, and change details in 3D assets
In one of the articles, “Image Editing & Generation with ChatGPT”, we covered how 3D models are made with GPT-4o and Blender.
However, in ComfyUI, you don’t need to jump from one app to another.
- This whole thing works in MV-Adapter. To make it work, download the models here: <https://huggingface.co/huanngzh/mv-adapter> (Click Files & versions in HuggingFace and get the checkpoint weights, VAE, and configs).
IG2MV – Single image + 3D mesh
TG2MV – Text prompt + 3D mesh
Texturing – Grid image + 3D mesh
VERY IMPORTANT! You drop all models into the CHECKPOINTS folder inside ComfyUI. This is where the node pulls them from, so everything needs to sit in one place.
Why do you download several models? Each one handles a different type of generation. For example, one works for text, another for images, another for audio, and another for animation. You switch between them depending on what you want to make.
- Then we need workflows.
To recreate this exact example, two workflows were used: T2MV (to generate the base images) and Texturing. Just add everything inside the ComfyUI folder again.
In the ComfyUI window, simply drag and drop the .json file with a workflow onto the workspace. The workflow will load automatically, so you don’t need to click anything else.
Usually, if any models are missing, ComfyUI will prompt you to download them automatically.
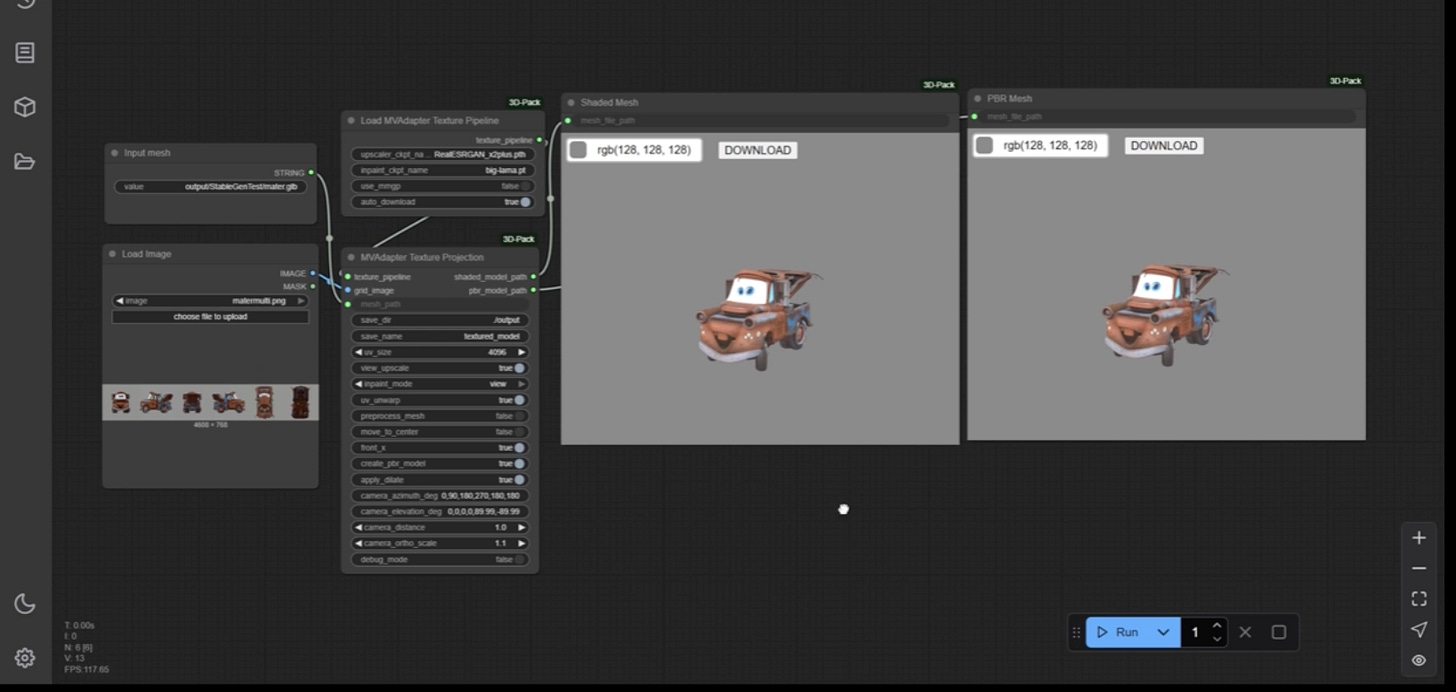
This is exactly where the Manager becomes useful. As you can see, this workflow isn’t the standard one that appears by default. In the Manager, you can find your ComfyUI-3D-Pack, and then you can add Custom Nodes. Don’t forget to restart ComfyUI to display it correctly!
Final Thoughts
These are the first steps you need to get started with ComfyUI. If you’re not ready for more advanced workflows, start by playing around with the templates inside ComfyUI and see how they work. Most of the models you’ll need are already loaded there!
The bottom line
This is truly for those who care about every little detail. You can control the models, the seeds, iterations, how much to alter the image, upscaling parameters, masks for inpainting, and so on. But if you don’t feel like going through all that (and I totally get it), there are plenty of other tools that handle all the complicated decisions for you.
More friendly-user tools:
To discover how this magic works, here are some guides for you:
How to use ComfyUI for beginners
Getting Started with AI Image Generation
This article was first published in the Creators AI newsletter. View the original edition.